
"DVD Recording"
HD DVD recording is done either on Blu-ray Disc, HD-DVD or Hard Drive (as in a regular PC), although some of the latest models combine both technologies. The Blue-Ray disc and an HD-DVD player deliver the real high definition experience on the size of a normal DVD disc. The basic principle of operation using a Blue-Ray disc is the following - during data writing, an optical laser stores code on the disc while it spins, modifying its surface, from the centre of the disc outwards. The hollow areas are considered as '0', while the flats are '1'. Everything is binary in the world of computers so this is how this idea is implemented in the case of DVDs and Blu-ray. The laser is basically what burns those depressions on the surface of the disc, so the higher the frequency of that laser, the more 0s and 1s can be stored on the surface, hence - greater disc capacity. The name 'Blue-Ray' comes from the fact that the frequency of the that laser is so high that it reaches the blue end of the spectrum. That was the brief technological breakdown, now let's review the top blu ray recorders.
There is a big battle taking place between HD-DVD and Blue-Ray as to which technology will prevail and become dominant on the market. Blu-Ray vs. HD-DVD is the battle between standards and respective companies behind those standards. Now as a consumer, you must make a choice between HD-DVD and Blue-Ray. Which format will you choose? The choice will reflect on your next purchases for the future as to what type of HD camcorder you will buy, what type of discs you will buy and so on. Sony is the company behind Blue-Ray as this technology used in all their recorders and players, as well as the new Playstation 3. As you can probably guess, PS3's biggest competitor - xBox 360 by Microsoft uses HD-DVD discs. HD-DVD is the technology that came first, so those who have already taken the plunge can rejoice from the fact that prices on HD-DVD discs, recorders and players are drastically falling.
HD DVDs come in three different versions: single- or dual-layer HD DVD-only discs; twin-format discs (with a standard dual-layer 8.5GB DVD on one side and a 30GB dual-layer HD DVD on the other); and hybrid discs (a single-sided disc with a standard 4.7GB layer that plays on any DVD player as well as a 15GB HD layer).
Blu-ray discs can hold more data or video than HD DVD counterparts and for the very same reason, are more expensive. The thing is that some Hollywood studios have decided to work with HD-DVd (Paramount, Universal and Warner), while others have decided on Blu-Ray (Sony Pictures, MGM/Columbia TriStar, Fox, Warner, and Lions Gate). quality of both Blu-ray and HD DVD discs varies with the film itself, but titles available on both formats generally have identical video quality.
Wednesday, January 30, 2008
Tuesday, January 22, 2008
Assignment #4
"Motherboard Package Type"

 PPGA Package TypePPGA is short for Plastic Pin Grid Array, and these processors have pins that are inserted into a socket. To improve thermal conductivity, the PPGA uses a nickel plated copper heat slug on top of the processor. The pins on the bottom of the chip are staggered. In addition, the pins are arranged in a way that the processor can only be inserted one way into the socket. The PPGA package is used by early Intel Celeron processors, which have 370 pins.

 OOI Package TypeOOI is short for OLGA. OLGA stands for Organic Land Grid Array. The OLGA chips also use a flip chip design, where the processor is attached to the substrate facedown for better signal integrity, more efficient heat removal and lower inductance. The OOI then has an Integrated Heat Spreader (IHS) that helps heatsink dissipation to a properly attached fan heatsink. The OOI is used by the Pentium 4 processor, which has 423 pins.
FC-PGA Package Type

FC-PGA Package TypeThe FC-PGA package is short for flip chip pin grid array, which have pins that are inserted into a socket. These chips are turned upside down so that the die or the part of the processor that makes up the computer chip is exposed on the top of the processor. By having the die exposed allows the thermal solution can be applied directly to the die, which allows for more efficient cooling of the chip. To enhance the performance of the package by decoupling the power and ground signals, FC-PGA processors have discrete capacitors and resistors on the bottom of the processor, in the capacitor placement area (center of processor). The pins on the bottom of the chip are staggered. In addition, the pins are arranged in a way that the processor can only be inserted one way into the socket. The FC-PGA package is used in Pentium® III and Intel® Celeron® processors, which use 370 pins.
PPGA Package Type
 PPGA Package TypePPGA is short for Plastic Pin Grid Array, and these processors have pins that are inserted into a socket. To improve thermal conductivity, the PPGA uses a nickel plated copper heat slug on top of the processor. The pins on the bottom of the chip are staggered. In addition, the pins are arranged in a way that the processor can only be inserted one way into the socket. The PPGA package is used by early Intel Celeron processors, which have 370 pins.
 SECC2 Package Type

S.E.C.C.2 Package TypeThe S.E.C.C.2 package is similar to the S.E.C.C. package except the S.E.C.C.2 uses less casing and does not include the thermal plate. The S.E.C.C.2 package was used in some later versions of the Pentium II processor and Pentium III processor (242 contacts).
FC-PGA2 Package Type

FC-PGA2 Package TypeFC-PGA2 packages are similar to the FC-PGA package type, except these processors also have an Integrated Heat Sink (IHS). The integrated heat sink is attached directly to the die of the processor during manufacturing. Since the IHS makes a good thermal contact with the die and it offers a larger surface area for better heat dissipation, it can significantly increase thermal conductivity. The FC-PGA2 package is used in Pentium III and Intel Celeron processor (370 pins) and the Pentium 4 processor (478 pins).
OOI Package Type
 OOI Package TypeOOI is short for OLGA. OLGA stands for Organic Land Grid Array. The OLGA chips also use a flip chip design, where the processor is attached to the substrate facedown for better signal integrity, more efficient heat removal and lower inductance. The OOI then has an Integrated Heat Spreader (IHS) that helps heatsink dissipation to a properly attached fan heatsink. The OOI is used by the Pentium 4 processor, which has 423 pins.
Thursday, January 17, 2008
Assignment #3
"Motherboard form Factors"
 AT - Advance Technology
AT & Baby ATPrior to 1997, IBM computers used large motherboards. After that, however, the size of the motherboard was reduced and boards using the AT (Advanced Technology) form factor was released. The AT form factor is found in older computers (386 class or earlier). Some of the problems with this form factor mainly arose from the physical size of the board, which is 12" wide, often causing the board to overlap with space required for the drive bays.
Following the AT form factor, the Baby AT form factor was introduced. With the Baby AT form factor the width of the motherboard was decreased from 12" to 8.5", limiting problems associated with overlapping on the drive bays' turf. Baby AT became popular and was designed for peripheral devices — such as the keyboard, mouse, and video — to be contained on circuit boards that were connected by way of expansion slots on the motherboard.
Baby AT was not without problems however. Computer memory itself advanced, and the Baby AT form factor had memory sockets at the front of the motherboard. As processors became larger, the Baby AT form factor did not allow for space to use a combination of processor, heatsink, and fan. The ATX form factor was then designed to overcome these issues

 LPX
LPX
 NLX
NLX
AT - Advance TechnologyAT & Baby ATPrior to 1997, IBM computers used large motherboards. After that, however, the size of the motherboard was reduced and boards using the AT (Advanced Technology) form factor was released. The AT form factor is found in older computers (386 class or earlier). Some of the problems with this form factor mainly arose from the physical size of the board, which is 12" wide, often causing the board to overlap with space required for the drive bays.
Following the AT form factor, the Baby AT form factor was introduced. With the Baby AT form factor the width of the motherboard was decreased from 12" to 8.5", limiting problems associated with overlapping on the drive bays' turf. Baby AT became popular and was designed for peripheral devices — such as the keyboard, mouse, and video — to be contained on circuit boards that were connected by way of expansion slots on the motherboard.
Baby AT was not without problems however. Computer memory itself advanced, and the Baby AT form factor had memory sockets at the front of the motherboard. As processors became larger, the Baby AT form factor did not allow for space to use a combination of processor, heatsink, and fan. The ATX form factor was then designed to overcome these issues

ATX - Advance Technology Extended
With the need for a more integrated form factor which defined standard locations for the keyboard, mouse, I/O, and video connectors, in the mid 1990's the ATX form factor was introduced. The ATX form factor brought about many chances in the computer. Since the expansion slots were put onto separate riser cards that plugged into the motherboard, the overall size of the computer and its case was reduced. The ATX form factor specified changes to the motherboard, along with the case and power supply. Some of the design specification improvements of the ATX form factor included a single 20-pin connector for the power supply, a power supply to blow air into the case instead of out for better air flow, less overlap between the motherboard and drive bays, and integrated I/O Port connectors soldered directly onto the motherboard. The ATX form factor was an overall better design for upgrading.
With the need for a more integrated form factor which defined standard locations for the keyboard, mouse, I/O, and video connectors, in the mid 1990's the ATX form factor was introduced. The ATX form factor brought about many chances in the computer. Since the expansion slots were put onto separate riser cards that plugged into the motherboard, the overall size of the computer and its case was reduced. The ATX form factor specified changes to the motherboard, along with the case and power supply. Some of the design specification improvements of the ATX form factor included a single 20-pin connector for the power supply, a power supply to blow air into the case instead of out for better air flow, less overlap between the motherboard and drive bays, and integrated I/O Port connectors soldered directly onto the motherboard. The ATX form factor was an overall better design for upgrading.
 LPX
LPXWhite ATX is the most well-known and used form factor, there is also a non-standard proprietary form factor which falls under the name of LPX, and Mini-LPX. The LPX form factor is found in low-profile cases (desktop model as opposed to a tower or mini-tower) with a riser card arrangement for expansion cards where expansion boards run parallel to the motherboard. While this allows for smaller cases it also limits the number of expansion slots available. Most LPX motherboards have sound and video integrated onto the motherboard. While this can make for a low-cost and space saving product they are generally difficult to repair due to a lack of space and overall non-standardization. The LPX form factor is not suited to upgrading and offer poor cooling
 NLX
NLXBoards based on the NLX form factor hit the market in the late 1990's. This "updated LPX" form factor offered support for larger memory modules, tower cases, AGP video support and reduced cable length. In addition, motherboards are easier to remove. The NLX form factor, unlike LPX is an actual standard which means there is more component options for upgrading and repair.
Many systems that were formerly designed to fit the LPX form factor are moving over to NLX. The NLX form factor is well-suited to mass-market retail PCs.
Many systems that were formerly designed to fit the LPX form factor are moving over to NLX. The NLX form factor is well-suited to mass-market retail PCs.
Thursday, December 13, 2007
Assignment #2
"Installing Windows 2000 Professional"
loadTOCNode(2, 'summary');
To install Windows 2000 Professional, follow these steps:
1.
Start the installation by using one of the following methods:
•
Start from the Windows 2000 Professional installation CD-ROM. Make sure that the CD-ROM is set to start before the hard disk starts. Insert the CD-ROM, and then when you are prompted, press any key to start the Windows 2000 Professional Setup program.
•
Start from boot disks. Insert Disk 1, and then insert each of the remaining three floppy disks when you are prompted to do so. For additional information about creating boot disks for Windows 2000, click the article number below to view the article in the Microsoft Knowledge Base:
197063 (http://support.microsoft.com/kb/197063/EN-US/) How to Create Setup Boot Disks for Windows 2000
•
Start from within a current operating system. Insert the CD-ROM, and then, at a command prompt, type drive:\i386\winnt32.exe and then press ENTER, or if this is an installation on a computer that has no previous installation of Windows, type drive:\i386\winnt.exe and then press ENTER, where drive is the letter of the CD-ROM drive.
2.
Setup inspects your computer's hardware configuration and then begins to install the Setup and driver files. When the Microsoft Windows 2000 Professional screen appears, press ENTER to set up Windows 2000 Professional.
3.
Read the license agreement, and then press the F8 key to accept the terms of the license agreement and continue the installation.
4.
When the Windows 2000 Professional Setup screen appears, either press ENTER to set up Windows 2000 Professional on the selected partition, or press C to create a partition in the unpartitioned space.
5.
If you choose to install Windows 2000 Professional on a file allocation table (FAT) partition, specify whether you want to:
•
Leave the current file system intact.
•
Format the partition as FAT16.
•
Convert the existing file system to the NTFS file system.
•
Format the partition by using the NTFS file system.Press ENTER after you make your selection. Setup examines the existing hard disks and then copies the files that are needed to complete the installation of Windows 2000 Professional. After the files are copied, the computer restarts.Important Do not press a key to boot from your CD-ROM drive when your computer restarts.
6.
When the Windows 2000 GUI Mode Setup Wizard appears, click Next to start the wizard. Setup detects and installs such devices as a specialized mouse or keyboard.
7.
When the Regional Options dialog box appears, customize your installation of Windows 2000 Professional for locale, number format, currency, time, date, and language, if necessary. Click Next.
8.
In the Personalize Your Software dialog box, type your name and the name of your organization, and then click Next.
9.
In the Product ID dialog box, type the 25-character product key, and then click Next.
10.
In the Computer Name and Password dialog box, either accept the default name that Setup generates or assign a different name for the computer. When you are prompted for an administrative password, type a password for the Administrator account. (You can leave the box blank; however, this is not recommended.) Click Next.
11.
In the Date and Time Settings dialog box, set the correct date and time for your computer. You can also specify which time zone you are in and set the computer to automatically adjust the clock for daylight saving time. Click Next.
12.
Setup installs the networking software and detects your network settings. When the Network Settings dialog box appears, click either
•
Typical to set default network settings such as File and Print Sharing for Microsoft Networks, Client for Microsoft Networks, and TCP/IP protocol that uses Dynamic Host Configuration Protocol (DHCP), or
•
Custom to specify the network components that you require for your network environment,and then click Next.
13.
In the Workgroup or Computer Domain dialog box, specify the workgroup or the domain to join. If you indicate that you are part of a domain, specify your domain user name and password. Click Next.Setup installs the networking components.
14.
During the final stage of installation, Setup installs Start menu items, registers components, saves settings, and removes temporary files. When the Completing the Windows 2000 Setup Wizard dialog box prompts you to do so, remove the Windows 2000 CD-ROM, and then click Finish to restart the computer.
15.
After the computer restarts, click Next in the Welcome to the Network Identification Wizard dialog box.
16.
In the Users of This Computer dialog box, specify either that users must enter a user name and password or that you want Windows 2000 to automatically log on a specific user when the computer starts. Click Finish.When the Windows 2000 Professional desktop appears, the installation is complete.
Tuesday, November 27, 2007
Assignment #1
"Windows 9x/Me Installation"
How to Dual-Boot Windows 9X/Me and 2000 Prolast updated: 6/10/01
Introduction. The purpose of this article is to provide step-by-step procedures for installing both Windows 9X/Me and Windows 2000 Pro on the same hard disk drive so that either operating system can be selected from a menu when the computer first starts/boots-up. Actually, a computer can be configured to boot Windows 2000, Windows NT, either Windows 95 or Windows 98, and MS-DOS. It cannot be configured to boot multiple versions of Windows 9X (Windows 95, 98, 98 SE, and Me) because they use the same boot file; however, there are third party utilities which can do it. Install MS-DOS first, to multiple boot Windows 2000, Windows NT, Windows 95 or Windows 98, with MS-DOS. This article will show how to dual-boot Windows 98, 98 SE, or Me with Windows 2000 Professional. Multiple-boot configurations with Windows NT and Windows 95, etc. are implemented in a similar fashion.
Step-by-Step Instructions.
1. See our How to Install the Windows 98 Upgrade on a New Hard Disk Drive, How to Install Windows Me, and How to Build a Computer with an AMD Socket A Athlon or Duron Processor: Part 8 - Prepare the Hard disk Drive and Part 9 - Install Windows and Motherboard Drivers for instructions on partitioning a hard disk drive and installing Windows.
2. Partition your hard disk so that you have a separate partition for each operating system. Or, partition your drive so it has one partition for Windows 9X, SE, or Me (we'll call it Win 9X from now on) and enough free space (unpartitioned space) for the installation of Windows 2000 (we'll call it Win 2K for short).
Windows Me was already installed on my 30 GByte drive. It had two partitions and 4 GBytes of free space. I installed Win 2K into the free space. The Win 2K installation partitioned and formatted the free space. This will be described later in this article.
If you are going to do this procedure with a disk drive that already has data on it, I strongly recommend that you back-up your data. I didn't. Proceed at your own risk.
3. Install Win 9X first. If you install it after installing Win 2K it will overwrite the C:\BOOT.INI file you will not be able to dual-boot.
4. Boot to Win 9X.
5. Insert the Win 2K CD in your CD-ROM drive.
6. It should autostart and display the following message:
This CD-ROM contains a newer versions of Windows than the one you are presently using. Would you like to upgrade to Windows 2000?
7. Click Yes (we will not actually upgrade Win 9X).
8. This may result in the following error:
The option to upgrade will not be available at this time because Setup was unable to load the filec:\WINDOWS\UpgDlls\w95upg.dll\WIN9XUPG\W95UPG.DLLThe system cannot find the file specified.
Ignore the error and click OK.
9. This will produce the following message:
Welcome to the Windows 2000 Setup Wizard....
What do you want to do?
o Upgrade...o Install a new copy of Windows 2000 (Clean Install) ...
Friday, November 16, 2007
amd memory
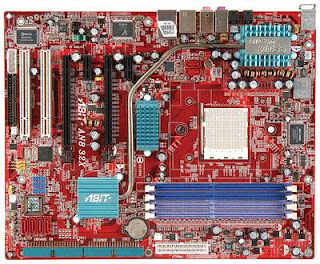 Memory is supported by four 184-pin DIMM sockets with the usual Dual channel DDR400 non-ECC un-buffered memory capability. Maximum memory capacity is up to 8GB. Onboard features are four ports SATA 3Gbp/s RAID 0/1/0+1 controller from the South bridge and two SATA 3Gbp/s RAID 0/1 ports from the Sil 3132 controller. Additional features include NVIDIA Gigabit Ethernet with NVIDIA Firewall ActiveArmor, Firewire IEEE 1394 support at 400 Mb/s transfer rate, AC'97 7.1-channel audio surround sound and auto Jack sensing and Optical S/P DIF In/Out.
Thursday, November 15, 2007
Latest Motherboard
 The Intel® Desktop Board DG965OT is based on the Intel® G965 Express Chipset that supports 1066-MHz system bus, Intel® Graphics Media Accelerator X3000 with Intel® Clear Video Technology, dual-channel DDR2 800 MHz SDRAM and discrete PCI Express* x16 graphics in the micro ATX form factor. Premium features such as support for Intel® Viiv™ technology∇, Intel® High Definition Audio (enabling 7.1 surround sound), Dolby* Home Theater* certification, Intel® PRO 10/100/1000 Network Connection and 1394a deliver stability and new features for consumers to enjoy a great digital entertainment experience. This Intel Desktop Board comes with the software required to meet Intel® Viiv™ technology brand verification requirements, which simplifies the task of building a PC based on Intel® Viiv™ technology.
Subscribe to:
Posts (Atom)
